So I would guess that most people like croissants. But here’s the thing, I like croissants a little more than your average person. No really, I even wrote my law school admissions essay on croissants.

Anyways, I’ve always enjoyed croissants, but when I was staying in Paris for a few weeks back in early 2011 I really truly fell for them. While there, I took a baking class that involved learning the basics for pastry dough and I’ve been making them ever since I came back to DC.
So I’ll be upfront with you, pastry dough and croissants are not the easiest thing out there to make (don’t get intimidated by the long instructions below). BUT if you are patient, they are totally worth it. The hardest part is you have to have your craving for them about 48 hours in advance. Most of us are used to instant gratification, so this may seem hard, but I’m telling you, it’s WORTH IT.
The reason you need your craving 48 hours in advance is that the dough must be prepped three different times. And after the first two times, it is best if it then is left in the fridge overnight. For example, when I want to serve them for brunch on Sunday, I get started Friday night. I know this sounds tedious, but when you smell that amazing flaking buttery dough coming out of the oven on Sunday morning, you’ll forget about all of the work.
Ingredients
Phase 1-
2 teaspoons active dry yeast (if you are using a packet, just use the entire packet)
1/2 teaspoon salt
1 tablespoon sugar
1/2 cup warm water
4 cups flour
2 tablespoons sugar
1 teaspoon salt
1 cup milk
4 tablespoons vegetable oil
Phase 2-
2 sticks of butter
Phase 3-
1 egg
1 tablespoon water
Supplies
Electronic Mixer with paddle and bread attachments (you could also do this by hand if necessary, but much easier with a mixer)
Plastic wrap
Parchment paper
Wood rolling pin
Cookie sheet
Brush
Phase 1-
1. So the first phase is nice and easy to get us started. In a bowl, you’re going to mix a packet of active dry yeast. I tend to use Fleischmann’s because it’s the easiest for me to buy. I did once try yeast from Whole Foods (the natural kind that comes in the bins) and it was a disaster. So I suggest sticking with the kinds that come in small packets. You’re going to add ½ teaspoon of salt, 1 tablespoon of sugar, and ½ a cup of warm water (I just do it as warm is gets coming out of my sink). Once you have all four ingredients in a bowl, you can use a fork or spoon to mix it up until everything dissolves. Then let it sit for five minutes. By the end it should be frothy.
2. After five minutes, you are going to mix the contents of the bowl in a stand mixer with 4 cups of flour, 2 tablespoons of sugar, 1 teaspoon of salt, 1 cup of milk, and 4 tablespoons of vegetable oil. Note: for the milk, I have also tried using almond milk. I am lactose intolerant and so don’t always have regular milk around. The almond milk also works very well.
3. When mixing this in the mixer, I recommend starting with the paddle attachment and then as soon as it starts to form into a ball, switching to the bread attachment. You may also have to use your hands to get the last little bit worked in. Once it is formed into a ball and everything is worked in, take out the dough and wrap it very tightly in plastic wrap. I tend to do like 6-10 layers of plastic wrap. The dough is going to expand and often finds a way to wiggle out of the plastic wrap, so I also tend to put it in a ziploc bag as well, to keep it from getting all over my fridge.
4. Then let it sit in the fridge and expand. I recommend doing it overnight. I sometimes start phase 2 the next morning, or sometimes even the next afternoon/evening to give it as much time as possible.

Phase 2-
1. So this next step is a really great one to do when you have a little extra anger you would like to get rid of. You are going to place your two sticks of butter in between two pieces of wax paper. I’d recommend giving yourself lots of wax paper to work with. You are then going to use the wood rolling pin to pound out the butter (or take your anger out on whomever deserves it). Once the butter has started to flatten, you can switch from pounding to rolling. Your goal is to get the butter into flat sheets that can then be transferred to the dough. Note- you’ll want to take your two sticks of butter out of the fridge right as you are ready to start this first step because it will be much easier – and less messy – with cold butter as opposed to room temperature butter.

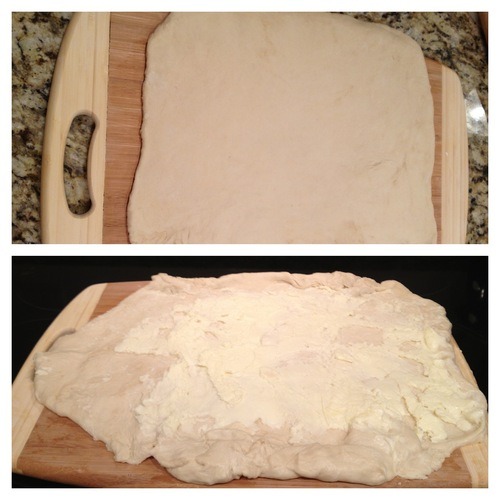
2. Once the butter is flattened out, you can stick this back into the fridge. You are now going to roll the dough out and you want the butter to stay cold while you do this. You will know your dough is doing well if it has expanded like in the picture above. You are going to take it out of the plastic wrap and put it on a lightly floured surface. You can do it straight on your counter or I tend to use a large wood cutting board that I have.
3. You will then use your rolling pin to roll it. Be gentle with the dough. Roll one direction then the other, occasionally turning it over and again lightly dusting the surface. Your goal is to get it into the shape of a long rectangle. You are then going to take the butter out of the fridge. Take off the top sheet of wax paper and lay the butter down on the dough. You want to cover about 2/3s of the dough with butter. Once you have laid the butter down, you can start to peal off the second sheet of wax paper. This can be difficult, but just do your best to leave as much butter as possible on the dough. Again, you want to work quickly so that the butter does not get too warm, because that can make it even trickier.
4. Once the butter is situated on the dough, you will fold over the side of the dough that does not have any butter on it. So in the picture above, you would folder over the left side. You want to fold it into thirds, as if you were folding a letter to place it in an envelope. Once the first piece is folded over, you can then fold the right piece on top. See below. You will also want to use your thumbs to seal the two ends so that butter does not escape in the next step.

5. You now need to roll the dough out again into a long flat rectangle. Be careful to not let the butter escape. Once the dough is again in the shape of a rectangle, you will fold it again. This time into what I think of as a book. See the first picture below. Then you will fold this in half and again seal it very tightly in plastic wrap, and again in a ziplock bag. You can then place the dough back in the fridge overnight. If you had done this in the morning, you could technically then take it back out that evening to bake and eat, but assuming you have prepped it on Saturday, I’d recommend leaving it overnight and eating it on Sunday.

Phase 3-
1. Preheat the oven to 450 degrees. When you take the dough out of the fridge it should have expanded again. If you’re like me and do not want to bake all of the dough at one time, you can cut the roll in half while still in the plastic wrap and put one back in the fridge if need be. The longest I have left the dough in the fridge is 3-5 days. I have also tried freezing it, but that did not end well.

2. Now, roll the dough out into a rectangle, like you previously did. You can then use a knife (or I prefer a pizza cutter) to cut the dough into small, medium, or large rectangles. The size is up to you, just depends on how big or small you’d like your croissants to be. Once the dough is cut, you have the option of adding fillers. My favorites are chocolate chips, honey, apple and cinnamon, or pumpkin. You could also do savery ones- bacon, veggies, ham, cheese, etc. Just be careful to not put too much filling in or it will spill out as soon as you start rolling them up. In the photo below, I used chocolate chips.

3. Next, you want to roll the croissants up. As you place them on a cookie sheet, I’d recommend setting them so that the loose end is on the bottom, not the top. This will help them from expanding in the oven and opening up. Also, I have silicone baking liners and I use these on the cookie sheets. If you are not using these, you would want to spray the sheets or butter them lightly to prevent the croissants from sticking.
4. Once they are all situated on a pan, you will want to mix one egg with a tablespoon of water in a bowl. You are then going to brush this mixture on top of all of the croissants. This helps them to brown in the oven. I have a small cooking brush that I use to do this.

5. Now the last, and easily the most satisfying step, you get to place the sheet in the oven. I tend to bake the croissants for around 10-12 minutes in my oven. But sometimes it takes as little as 8 or up to 15 minutes. This will depend on the size of them and your oven. So just watch them closely. You want them to brown slightly, but not too much. See below.

And that’s it folks. I know it sounds like a lot, and yes there are several steps, but the steps are each relatively easy. And oh so worth it. See the final product below.