
I am on a mission. I want to recreate the classic Entenmann’s glazed donuts. I have so many fond memories of eating these guys in the back of my parent’s car on the way to ski trips, or sitting around the campfire on family camping trips!
So what this means for you is that I’ll have a lot of donut adventures coming your way. For our Easter brunch last month, I tried these guys. They were good, light and fluffy, but not like the Entenmann’s ones. I prefer the heavier cakier donuts, but for those of you who like the lighter fluffy ones, here’s a great recipe.

Recipe adapted from here.
Ingredients (makes 13 donuts and 13 holes)
3/4 cup buttermilk
1 egg
3 egg yolks
1/3 cup canola oil
3 3/4 cups cake flour (you can find out how to make it here)
1 cup granulated sugar
2 teaspoons baking powder
1/2 teaspoon baking soda
1 1/2 teaspoons ground cinnamon
1/4 teaspoon freshly grated nutmeg
Zest of 1 lemon
2 cups powdered sugar
Canola oil for frying (enough to pour 1-2 inches in your pan)
1. Mix your buttermilk, egg, egg yolks, and canola oil with a whisk. In a different bowl, put two cups of the flour and also whisk it.

2. In your electric mixer with the paddle attachment, add the remaining flour (1 3/4 cups), sugar, baking powder, baking soda, cinnamon, nutmeg, and lemon zest. Mix on low speed and then slowly add the buttermilk mixture. Stop mixing just as soon as the dough incorporates everything. Add in the remaining 2 cups of flour you set aside, and mix by hand with a spatula. It’s ok that the dough is sticky.


3. Now place the dough between two sheets of waxed paper. Then use your roller, and roll the dough out to an oval, about 8 x10 inches and 3/4 inches thick. Place on a cookie sheet, and put in the freezer for about 30 minutes.


4. Once the dough is firm enough to cut, take it out of the freezer and take off one of the sheets of wax paper. Dust that side with flour and replace the wax paper. Flip the dough over and get rid of the other piece of wax paper. Now, once the dusted side is on the bottom, you’ll be ready to cut the dough.
5. Take the cookie sheet you had the dough on in the freezer, and spray with cooking spray. Set aside.
6. If you have a donut cutter, get this out. If not, I use two different sized oval cookie cutters. Using these, I cut out the larger circles first, about 3 inches wide. Then I use the smaller one to cut out the middles (about 1 inch wide). You can save these middles to make donut holes. Using a sharp spatula, move the cut out donuts and holes to the prepared cookie sheet. If you want more donuts, re-roll out the scraps and continue cutting and re-rolling until you’re out of dough. You should get about 13 donuts and donut holes. Cover the pan with plastic wrap and chill in the fridge for 30 minutes to 1 day. If you chill it for 1 day, take the dough out of the fridge for 30-60 minute before frying.


7. Now, before you get started with frying, you want to make sure everything else is ready because donut frying is not easy. If you can borrow an extra set of hands for this frying stage, that would also be very helpful. But first up, prepare your glaze. Whisk the powdered sugar and 1/4 cup hot water. Make sure to do this in a larger bowl that you’ll be able to dunk the donuts in.

8. Place your large pan with high sides (or you can use a dutch oven) on the stove and get out a set of tongs to use. You also want to place a plate lined with paper towels and then a drying rack nearby to set the donuts on after cooking.
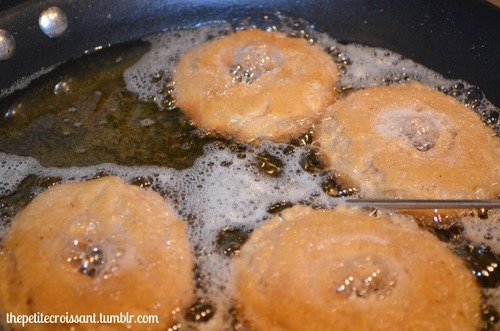
9. In your pan or dutch oven, heat 1-2 inches of oil over medium high heat. Place your candy thermometer in the pan and continue heating until it gets to 350 degrees. Now place 2-3 donut holes in the pan so you can get a sense of how they cook. You want them to start to brown, but not get too dark because they will continue to darken after you take them out of the pan. It should take about 1.5 minutes on each side for the donuts, and about 1 minute total for the holes. You can use your tongs to flip them over. Once the donuts are cooked, set them on the paper towel lined plate until the extra oil has drained. Them dunk each side in the glaze, and place them on the drying rack to cool.


10. You want to eat these guys on the day you serve them, preferably while they are still warm. They don’t keep well.


Pingback: Sour Cream Donuts | the petite croissant